



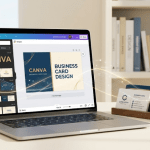


In the modern networking landscape, a business card remains an indispensable physical touchpoint. When entrepreneurs, freelancers, and corporate professionals search for “canva business cards,“ they are trying to bridge a specific gap: they want high-end, custom-designed branding materials without the steep price tag of a professional graphic design agency.
The core questions driving this search intent usually center around production viability and design execution:
Can a free or low-cost online template truly look premium enough to represent my brand to high-value clients?
How do I properly format a digital canvas so that it doesn’t print blurry, cut off important text, or leave awkward white margins?
Is it better to print directly through Canva’s fulfillment service, or should I export the files to a local print shop?
The primary problem is that while digital design tools have become incredibly user-friendly, the physical printing process remains bound by strict, unforgiving mechanical rules. A layout that looks flawless on a backlit, high-resolution smartphone screen can easily turn into a misaligned, low-contrast disaster when pressed onto paper stock. The user’s underlying goal is to master Canva’s ecosystem to produce a physical card that feels intentional, polished, and unmistakably professional.
Context and Background: The Democratization of Brand Design
Historically, creating a business card required a specialized workflow. A business owner had to hire a designer to build vector assets in complex software like Adobe Illustrator, ensure the color spaces were converted correctly for industrial ink, and manually calculate print metrics like “bleed” and “slug.”
Canva disrupted this paradigm by moving professional-grade design tools into an intuitive, web-based drag-and-drop interface.
The Ecosystem: Templates vs. Originality
Canva provides thousands of pre-made business card templates categorized by industry—ranging from minimalist layouts for real estate agents to vibrant, abstract patterns for creative agencies. However, this accessibility introduces a secondary challenge: brand homogenization. Because millions of users access the same template library, businesses risk using the exact same visual layouts as their direct competitors.
The Technical Divide: Digital Pixels vs. Physical Ink
To successfully utilize Canva for physical media, creators must understand the fundamental difference between screen design and print production:
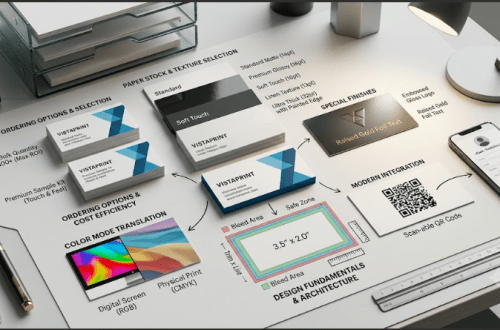
Resolution (DPI): Screen graphics typically render at 72 or 96 Dots Per Inch (DPI). Physical printing requires a minimum of 300 DPI to avoid pixelation and fuzzy edges.
Color Profiles: Web browsers and apps display colors using the RGB (Red, Green, Blue) light spectrum. Commercial printing presses use physical ink mixed via the CMYK (Cyan, Magenta, Yellow, Key/Black) process. When Canva exports a design for print, colors can shift slightly in vibrancy, meaning deep screen blues might look somewhat muted on matte paper.
The Bleed Zone: During commercial printing, large sheets of paper are stacked and sliced by industrial blades. Because these blades can shift by a fraction of a millimeter, designs must extend slightly past the final trim line to ensure no raw paper edges show through.
The Solution: A Foolproof Guide to Designing and Printing with Canva
To ensure your Canva business cards look like they came from a high-end design firm, you must follow a disciplined design and export protocol.
Step-by-Step Production Workflow
+-------------------------------------------------------------+
|               Step 1: Setup the Correct Dimensions          |
|               - Standard US Size: 3.5 x 2.0 inches          |
+-------------------------------------------------------------+
                              |
                              v
+-------------------------------------------------------------+
|          Step 2: Enable Layout & Safety Guides              |
|               - Turn on "Show Margins" & "Show Print Bleed" |
+-------------------------------------------------------------+
                              |
                              v
+-------------------------------------------------------------+
|         Step 3: Customize Typography & Asset Placements     |
|               - Max 2 fonts; maintain safe text zones       |
+-------------------------------------------------------------+
                              |
                              v
+-------------------------------------------------------------+
|         Step 4: Execute a High-Resolution Print Export      |
|               - Format: PDF Print | Profile: CMYK             |
+-------------------------------------------------------------+
1. Establish the Framework (Dimensions & Safety Lines)
Do not guess the size. When starting, explicitly select the “Business Card (Landscape)” or “Business Card (Portrait)” preset. In the United States and Canada, the standard physical dimensions are $3.5 \times 2.0\text{ inches}$.
Once your canvas opens, you must immediately activate the safety overlays. Navigate to File > View settings and check both “Show margins” and “Show print bleed.” * The Bleed Border: This adds an extra $0.125\text{ inches}$ around your canvas. Any background color, pattern, or image must be stretched all the way to this outermost edge.
The Safe Area: Keep all vital text (names, phone numbers, email addresses) inside the innermost margin line. If text sits too close to the edge, it risks being clipped during the cutting process.
2. Curate Typography and Contrast
One of the easiest ways to spot a DIY card is font overload. Limit your design to a maximum of two font families: one clean sans-serif font for readability (e.g., Helvetica, Montserrat, or Lato) and, if necessary, one distinct font for your brand name or header. Ensure your text contrasts sharply with the background; dark grey text on a black background or pale yellow text on a white card will be entirely unreadable once printed.
3. Select Your Print Path: Canva Print vs. Third-Party Vendor
Once your design is complete, you have two primary options for bringing it into the physical world:
| Print Method | Best For | Pros & Cons |
| Canva Print (Direct) | Convenience, fast turnarounds, beginners. | Pros: Direct rendering, zero file transfers, eco-friendly packaging. Cons: Limited paper stock customization. |
| External Vendor (Vistaprint, local print shop) | Premium finishes, custom textures, bulk discounts. | Pros: Access to linen textures, foil stamping, painted edges, thick cardstocks. Cons: Requires manual file exporting and strict compliance checking. |
4. The Perfect Export Settings (For External Printers)
If you decide to use an external print shop, your download settings must be precise to ensure maximum crispness. Click Share > Download, and configure the options exactly as follows:
File Type: Select PDF Print (do not use “PDF Standard,” “PNG,” or “JPG,” as these will compress your file and blur text).
Crop Marks and Bleed: Check this box. This prints tiny alignment marks that tell the print shop exactly where to slice the paper.
Color Profile: If you have a Canva Pro subscription, switch the color profile from RGB to CMYK (best for professional printing). If you are using the free version, your file will export in RGB, which is acceptable for basic online print vendors who automatically convert colors, but note that bright neon colors may lose a bit of their screen pop.
Conclusion: Professional Brand Identity Within Reach
Canva has successfully democratized graphic design, making it entirely possible to create a stunning, professional business card without an enterprise budget. However, a great design only succeeds if it translates perfectly to paper. By consciously setting up your print bleeds, respecting the safe margins, limiting your font selections, and exporting using high-resolution PDF Print configurations, you ensure that your physical card feels premium, looks sharp, and leaves a memorable impression on every contact you meet.